Excoveralls: Testing and Test Coverage
Resources
You must watch all videos before the lecture.
Recap Lecture 3 (13 min) Testing 1: Intro (9 min) Testing 2: ExUnit (16 min) Testing 3: Creating Tests (15 min) Testing 4: Test Coverage (10 min)
Objectives
-
1 point
/planets
lists planets or planet names either sorted by name or default order
-
1 point
/planets/n
lists planet by id if n is a valid id, it show information on that planet
-
1 point
/planets/random
should randomly select a planet and show its data
-
2 points
Flowbite Styling
Planet Table is fully Flowbite styled using a card, a heading, and a table.
-
2 points
100% Test Coverage on PlanetController
Excoveralls TestCoverage report created and indicates 100% test coverage for the PlanetController
1. Preparation
Let's start by creating a new Elixir module with the following content. We are not yet using a real database but we will use the same Model API (the M in the MVC framework) that Ecto will soon use to retrieve real data.
If you have watched the videos, you should know what the filename and location should be within the project directory:
defmodule App.Planets do
  @moduledoc """
  A context to retrieve data of our solar system.

  - `distance` is the relative distance to the Sun compared to Earth's distance to the sun.
  - `orbital_period` is the time it takes for a planet to orbit the sun (in Earth years)
  """

  @planets [
    %{id: 1, name: "Mercury", distance: 0.39, orbital_period: 0.24},
    %{id: 2, name: "Venus", distance: 0.72, orbital_period: 0.61},
    %{id: 3, name: "Earth", distance: 1.0, orbital_period: 1.0},
    %{id: 4, name: "Mars", distance: 1.52, orbital_period: 1.88},
    %{id: 5, name: "Jupiter", distance: 5.02, orbital_period: 11.86},
    %{id: 6, name: "Saturn", distance: 9.54, orbital_period: 29.46},
    %{id: 7, name: "Uranus", distance: 19.18, orbital_period: 84.01},
    %{id: 8, name: "Neptune", distance: 30.06, orbital_period: 164.8}
  ]

  def list, do: @planets

  def list(:sorted_by_name) do
    Enum.sort_by(@planets, fn planet -> planet.name end)
  end

  @doc """
  Returns a string containing all planet names, sorted alphabetically in ascending order, separated by semicolon.

  ## Examples
      Planets.names()
      "Earth, Jupiter, Mars, ..."
  """
  def names do
    :sorted_by_name
    |> list
    |> Enum.map(& &1.name)
    |> Enum.join(", ")
  end

  @doc """
  Returns a planet by id.

  ## Examples
      Planets.get(1)
      %{id: 1, name: "Mercury", distance: 0.39, orbital_period: 0.24}
  """
  def get(id), do: Enum.find(@planets, &(&1.id == id))
end
Next look up every Enum function you can find in the context module above in the Elixir documentation. Have a lenghty discussion with your partner on what they do and inspect the examples in the documentation. Ask your professor or AI if you need more clarification. It is very important that we get familar with those Enum functions as soon as possible and also remember them so we can connect the dots and use them when we need to.
Notice also that some function require a function as a parameter:
Enum.sort_by(@planets, fn planet -> planet.name end)
When that happens the function usually iterates through each element in a collection, in this case we iterate through planets and make planet.name the sort key. We could have added an optional parameter to change sorting to descending :desc but we left it at the default :asc.
Between fn and -> we find the parameters of the anonymous function. The function is anonymous because it doesn't have a name. Notice also that we used fn instead of def to further make that clear. The function body rests between -> and end. In Elixir we use functions as paramters a lot so there is short form for that:
Enum.sort_by(@planets, & &1.name)
This is the same function call as before. & indicates a function-parameter will be used and &1 represent the first parameter of that function, which was the planet.
&1.name thus means we are retrieving the name of the current planet. &2, &3 and so on do not exist in this function so attempting to use them will result in an exception.
There can be only one & (at the very beginning) and what follows (&1.planet) is always the function body.
If at this point you feel confused, rest assured, I totally get it. With time you will learn to appreciate the patterns. 3-4 years you have learned about object-oriented langugages and functional programming can be a learning curve.
2. Objectives 1-3 (PlanetController + View + Templates)
So now that we have done the legwork its time to discuss what to deliver for next lecture.
Your mission, should you choose to accept it, is to create a new controller PlanetController yourself that will handle three different scenarios:
/planetsshould show a list of planets or planet names similar to the previous exercise./planets/randomshould show data of a random planet/planets/:nshould show data of the planet with the given id (such as1) if an matching planet exists.
Here is how you could start your Controller:
defmodule AppWeb.PlanetController do
  use AppWeb, :controller

  alias App.Planets

  # TODO
end
- Don't forget to add routes to the router.
- Don't forget to create a view
planet_html.exsimilar to thepage_html - Don't forget to add template files. You might need two of them such as:
list.html.heex(for showing all planets) andshow.html.heex(for showing a single entry)
Regarding the /planets/random part the random function might be what you are looking for.
This should yield you the first three points.
3. Flowbite Styling
3.1 Installing Flowbite
Its time to replace DaisyUI with Flowbite. We are going to use npm (a very popular javascript package manager) for this.
From the default root of your project you will need to run the following:
npm install flowbite --prefix assets
If your npm command is not recognized you will need to install npm on your own with the help of google search/ AI. Remember that if you are on a Windows computer you will need to follow wsl/ubuntu install procedures, If you are on Mac, Homebrew is again the easiest option.
On the lab machines you enable the npm command via module load node.
The prefix will ensure the node_modules and package.json will be created in the assets folder. Note that if you took my settings the node_modules folder will be hidden from both the search and the project outliner. There should never be a need to manually mess with it, thus its better to hide it.
We now need to replace our entire assets/css/app.css file with the following:
@import "tailwindcss";
@import url('https://fonts.googleapis.com/css2?family=Inter:wght@300;400;500;600;700;800&display=swap');
@import "flowbite/src/themes/default"

@source "../node_modules/flowbite";
@source "../../lib/app_web";
@source "../css";
@source "../js";

@plugin "flowbite/plugin";
@plugin "../vendor/heroicons";

@theme {
  --font-sans: InterVariable, sans-serif;
  --font-sans--font-feature-settings: 'cv02', 'cv03', 'cv04', 'cv11';
}

/* Add variants based on LiveView classes */
@custom-variant phx-click-loading (.phx-click-loading&, .phx-click-loading &);
@custom-variant phx-submit-loading (.phx-submit-loading&, .phx-submit-loading &);
@custom-variant phx-change-loading (.phx-change-loading&, .phx-change-loading &);

/* dark mode support  */
@custom-variant dark (&:where(.dark, .dark *));

/* Make LiveView wrapper divs transparent for layout */
[data-phx-session], [data-phx-teleported-src] { display: contents }
This will get rid of DaisyUI artifacts and pull Flowbite assets instead.
We also need to add this line somewhere at the very top of our assets/js/app.js file:
import "flowbite/dist/flowbite.phoenix.js";
This will enable UI functionalities like dropdowns, animations, and such.
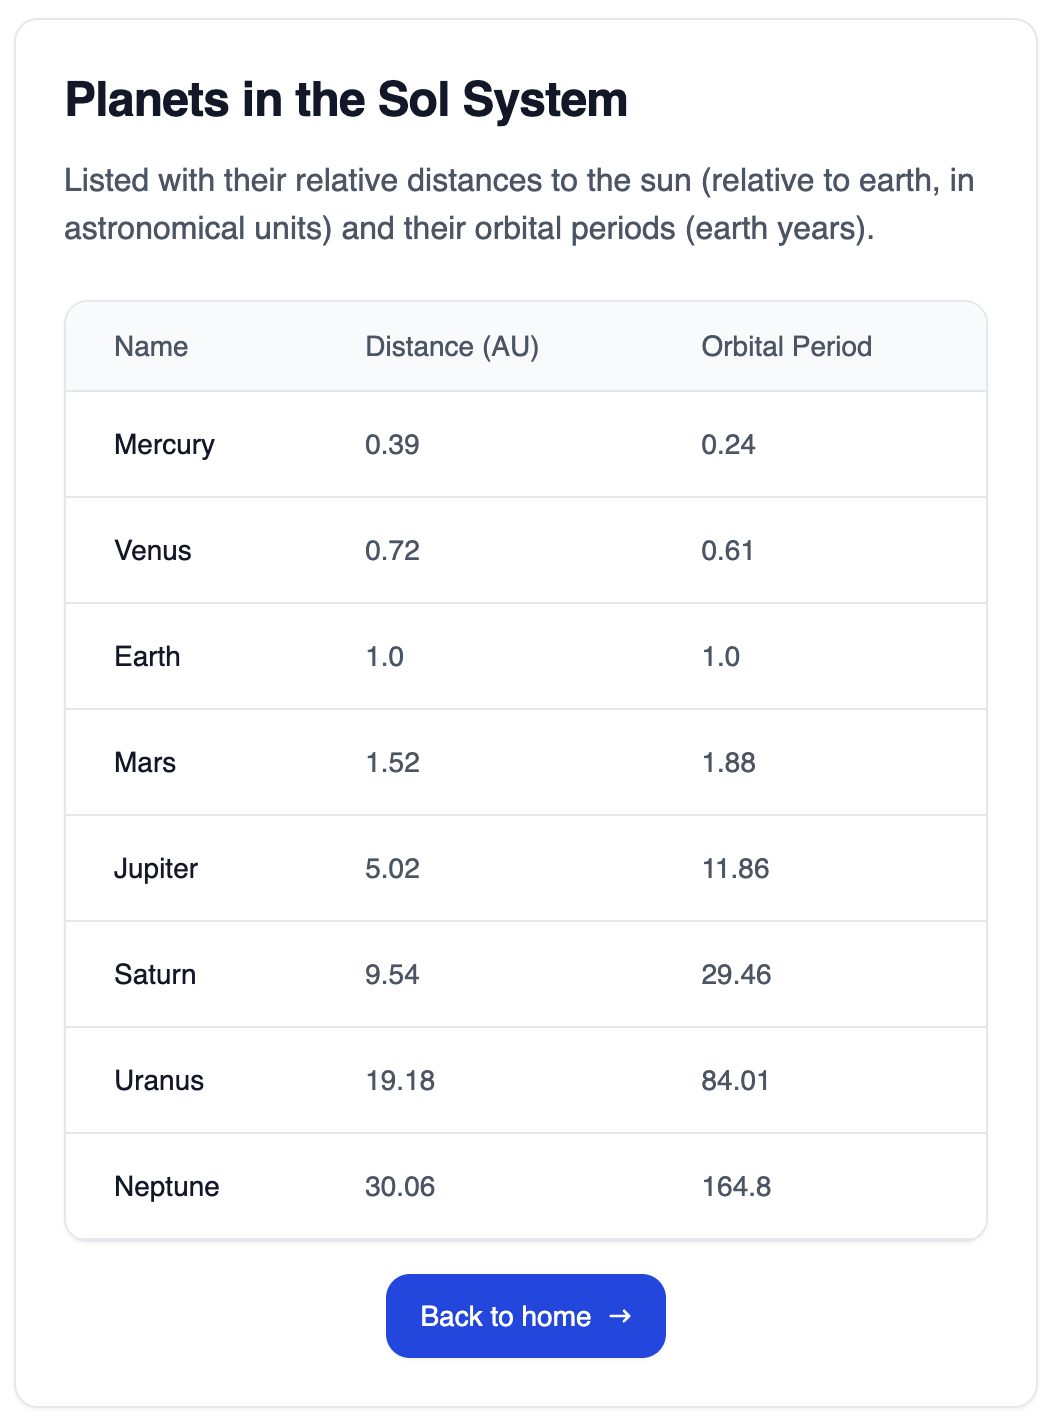
3.2 Styling the planets table (2 points)
Now that you have DaisyUI replaced with Flowbite your styling in /courses and / are likely broken. Thats okay. Just leave your courses.html.heex template as you left it in the previous lecture.
Your new objective is to properly adapt Flowbite Styling for the planets table combining styling from the Table and Card sections. Your end product may look like this:
4. Excoveralls Test Coverage (2 points)
The videos were about testing so this is the time we want to put that to practice. Once your functions work as expected (or even if not) you can work on your tests.
Start by installing excoveralls like I showed in the video and open the coveralls.html page under /cover once you have ran MIX_ENV=test mix coveralls for the first time.
I highly recommend you to bookmark that html file in your browser. You are going to open this file a lot in the future. If you see a report great. 1 point. That was easy.
Last we want to write a few tests in a similar fashion as seen in the videos with the ultimate objective to achieve 100% test coverage on our PlanetController. Ignore all other untested files.
Think about how you could test the randomness of the /planet/random` url. Some ideas:
  test "testing /planets/random", %{conn: conn} do
    # Set a seed so we always get the same "random" numbers when testing
    :rand.seed(:exsss, {100, 101, 102})

    conn = get(conn, ~p"/planets/random")
    # assert for as specific planet in your output (the one determined by seed)

    # call conn = get(...) again
    # assert for a different planet in your output
  end
Generally testing randomness is tricky and usually requires you to set a seed. The reason I have added this part of the excersise is, to show you how it can be done.
4.1 Commiting coverage report
When you generate your coverage report via
mix coveralls.html
It should end up under ./cover/excoveralls.html I highly recommend you to bookmark this so you can easily open it in the future. The html file will be updated each time you run the command.
Next update .gitignore and comment out the following line (by prepending a #) so I can see your coverage report as well (otherwise i can't grade this objective):
/cover/
Don't forget to deploy your completed work when done.