Phoenix Routes
Resources
You must watch all videos before the lecture.
Objectives
-
1 point
Forwarding Data
Controller contains a module attribute '@courses' that correctly forwards appropriate course data from at least the last two semesters to a controller action courses/2
-
2 points
Courses are displayed in a table
All Courses are displayed in form of a table when visiting /courses. They must not be hard-coded into the template.
-
2 points
Filtering courses
Visiting /courses/spring_2025 and /courses/fall_2024 yields different courses in the table
-
1 point
courses/2 is guarded
Your controller action must be guarded to only allow slugs for semesters you have implemented data for.
-
1 point
Table styled
Your table uses some tailwind css classes such as colors, padding or borders for styling.
As tempting as it might be, please refrain from starting to work on this (and future lecture instructions) before class starts. Half the fun is to explore the challenges together with your partner. Do watch the videos however before class starts!
In the first two weeks you have hopefully learned quite a lot about the elixir programming language. Today's video should introduced you to Phoenix routes.
1. Intoduction
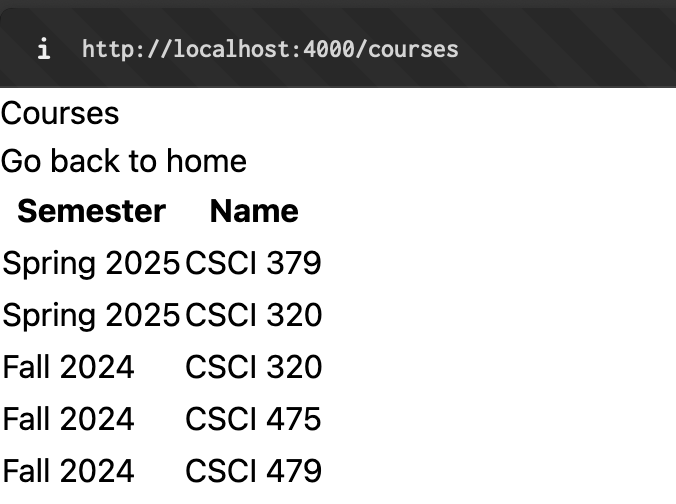
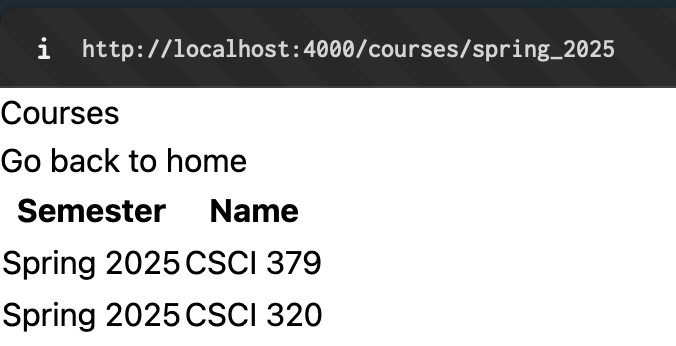
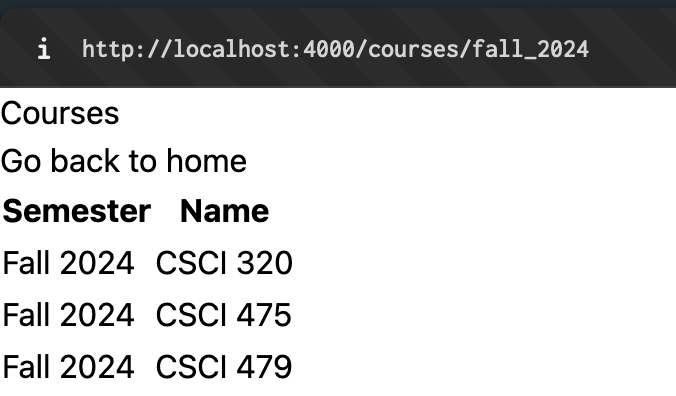
Today we are going to create a course page that lists the courses that you have taken in the last semesters. The idea is that we will end up with a page that displays the correct courses in form of a table depending on url:
My page is completely unstyled and ugly but functional! You will have an opportunity to style your page at the end but remember the golden rule: Functionality > Pretty
Let us start by revisiting the Router. We have learned how we can add basic routes. Lets look at how we can pass information into the url:
get "/courses", PageController, :courses
get "/courses/:slug", PageController, :courses
Notice that we created two routes and both point to the same action!
:slug is a placeholder and allows us to put anything in the url such as:
localhost:4000/courses/spring_2025
localhost:4000/courses/1
We can fetch what was given in the controller action:
def courses(conn, %{"slug" => slug}) do
  IO.inspect slug
  render(conn, :courses, layout: false)
end
Figure out what 'IO.inspect' is doing (if you forgot from the exercism track). Also notice how the IO.inspect slug line was written. This doesn't look like it but this is actually a function call. In Elixir parenthesis on function calls are optional if and only if there is no disambiguity:
IO.inspect slug           # same as IO.inspect(slug)
do_this a, b, hello: 2    # same as do_this(a, b, [hello: 2])
How cool is that?
Also notice what happend to the first line of the function:
# instead of:
def courses(conn, params) do
  slug = Map.get(params, "slug")
end

# we PATTERN-MATCHED to directly get the slug, discarding the rest of params
def courses(conn, %{"slug" => slug}) do

end
Pattern Matching is, in my opinion, one of the most amazing features of the language and reduces the code we write significiantly.
Lets move on by looking at the following handy function first:
defp slug_to_semester(slug) do
  slug
  |> String.capitalize()
  |> String.replace("_", " ")
end
Together with your partner and AI figure out (if you haven't already):
- what the difference between
defanddefpis - What the pipe
|>operator is doing - Based on the url's in the images above, can you guess what this function is doing?
Once you can comfortably answer those questions go ahead and add it to your page_html.ex file under the embed_templates line. This will make the function available in all our *.html.heex templates inside our page_html folder.
Next we will look at a module attribute:
defmodule AppWeb.PageController do
  use AppWeb, :controller

  @person %{name: "Sam Adams", age: 30}

end
A module attribute is like a global constant for a module. They are prepared at compile time thus cannot be reassigned once your server is running. They are often used to set up configuration, settings, or in our case, simulate data.
We can forward the value of any variable / module attribute to the page via the controller action like this:
defmodule AppWeb.PageController do
  use AppWeb, :controller

  @person %{name: "Sam Adams", age: 30}

  def home(conn, params) do
    render(conn, :home, layout: false, person: @person)
  end
end
In our home.html.heex i could now use any of the following to display the person on the screen:
<p>{@person.name} is {@person.age} years old.</p>
<p><%= "%{@person.name} is %{@person.age} years old." %></p>
<p><%= @person.name %> is <%= @person.age %> years old.</p>
2. Objective: Forwarding Data
Now think about the course data we need for our table. Each course has a name and a "slug" that is used both to display the semester's name and filter the table for correct entries.
Create a module attribute @courses inside your PageController and fill it with appropriate data for at least the last two semester's worth of your courses.
Hint A list of maps should do the trick but if you want to challenge yourself try a list of two element tuples instead!
Don't forget to forward the @courses assign to your controller action like it was shown above!
We will now learn on how to display many elements at once.
Add this code to a new file courses.html.heex under page_html:
<table>
  <thead>
    <tr>
      <th>Number</th>
    </tr>
  </thead>
  <tbody>
    <tr :for={n <- 1..10}>
      <td>{n}</td>
    </tr>
  </tbody>
</table>
3. Objective: Courses are displayed in a table
Observe the code above, then deduce and solve the mystery of how we can display our courses in form of a table!
4. Objective: Filtering courses
Going back to your controller action:
def courses(conn, ...) do
  # @courses and slug provided
  # TODO: filter courses by slug
  render(...)
end

def courses(conn, ...) do
  # only @courses provided
  # TODO: do not filter

  render(...)
end
In a video we have learned how we can use multiple clauses of a function so that we can handle parameters differently.
This is a perfect opportunity to try this out: One function variant can handle cases where we visited the /courses while the other function can handle cases where we visited /courses/:slug
Also look up the Elixir documentation for a function that would allow you to filter the list of courses that you have.
If you did everything correctly your website should now produce similar results as I have shown in the screenshots at the beginning.
5. Objective: courses/2 is guarded
Data Protection is critical in any web application. Think about possible values of slug. What if the user provided something invalid such as '1'?
We will want to guard against invalid values. We only want to allow and proceed with slug values that actually represent semester_strings we have data for!
Remember the video on guards and try to implement the logic. More information on guards can be found in the documentation.
You are only eligible for this objective if you actually guarded in the function header. Guarding logic within the function body (such as conditionals) is not acceptable.
You may simply let the server return an Error message when attempting to provide a slug that doesnt doesn't exist. This happens by default if attempting to call an action that doesn't exist.
If you feel adventurous you can attempt to instead display a custom error message such as "This appears to be an invalid semster."
Make sure that accessing /courses/invalid doesn't display the full list of courses like /courses
6. Objective: Styling
Its time to improve the ugly look of our table. You have two options:
- Scan the Tailwind CSS Documentation for some basic classes with which we could apply some colors, padding, or borders and add them to your html.
For example:
<p>Unstyled</p>
<p class="text-lg font-semibold text-blue-800">Blue big, fat heading.</p>
- Alternatively (recommended) you could already peek around in the DaisyUI, especially in the "Table" section and copy over a professional, prestyled template in which you can encase your own table.
TailwindCSS and DaisyUI come preinstalled with your Phoenix Project so there is no need for inital setup. Another good open-source library you might want to explore later in the semester is Flowbite.
For the objective I am looking into just some visible attempts in using Tailwind/DaisyUI to style some parts of the website. Nothing fancy is expected at this point in the semester.