In true test-driven development style we are going to start this lesson with some premade tests. Add the following section to your page_controller_test.exs file. Make sure it will end up inside the App.PageControllerTest module.
describe "/ contains" do
  setup %{conn: conn} do
    conn = get(conn, ~p"/")
    html = html_response(conn, 200)
    %{html: html}
  end

  test "typography", %{html: html} do
    assert html =~ "<h1"
    assert html =~ "<p"
    assert html =~ "<span"
  end

  test "a list", %{html: html} do
    assert html =~ "<li"
  end

  test "an image", %{html: html} do
    assert html =~ "<img"
  end

  test "links to /planets and /courses", %{html: html} do
    assert html =~ "<a "
    assert html =~ "href=\"/courses"
    assert html =~ "href=\"/planets"
  end

  test "styling", %{html: html} do
    assert html =~ "bg-"
    assert html =~ "rounded"
    assert html =~ "text-"
    assert html =~ "border"
  end
end
Notice a new keyword describe. Please read more about the macro in the official documentation.
In short, describe allows us to "group" tests together and even set up some variables that are needed in every test of such group.
Looking at our own describe block we can see that setup block at the top initializes a connection and changes it to be a web request to ~p"/". Thus every conn in the tests will already have made the get request so i don't have to repeat that code in each test. Practical!
Further when a test fails the description of the describe block is merged with the description of the actual test so a test error message may read like:
/ contains a list
/ contains an image
/ contains stying
There are some more advanced features in regards to testing. For example we could only run tests of a specific describe block or tests with a certain tag or inside a certain folder/file. If you are interested I encourage you to explore the ExUnit documentation but it would be too overwhelming for the average CSCI 379 student to deal with that just yet.
If you run ...
mix test
or (to update your test coverage report):
MIX_ENV=test mix coveralls.html
... you should now see all 5 of those tests fail.
Creating our own Startpage
Today's main objectice is to design a simple, personal home page layout using some basic layouts.
Requirements
- contains a level 1 (h1) heading with your name
- contains one or more paragraphs with interesting facts you want the world to know about you
- contains an image of you
- contains a list with perhaps hobbies, learned programming languages or anything else that defines you
- contains a little menu with at two links that point to your
/planetsand/coursesroutes
If you feel uncomfortable sharing information about yourself you can also describe a celebrity instead but I would find that rather boring if I were in your shoes.
Common Sense Warning You are working under the Bucknell Domain. You are representing Bucknell when you publish information on eg.bucknell.edu. It is illegal to post immoral, r-rated or otherwise questionable content and doing such might result in legal action. The course instructor is not responsible for the content you upload or share.
Here is a sketch of how your layout could look like:
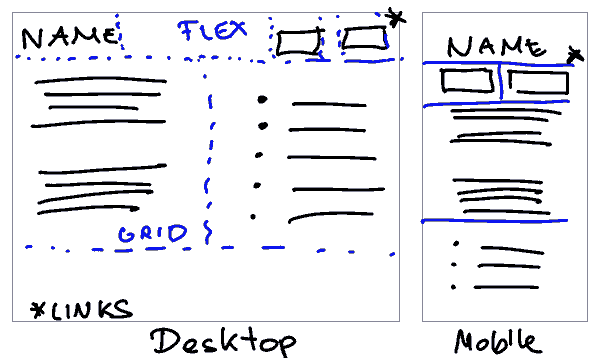
For this lecture only I want you to refrain from using any component library such as Flowbite. Do all your styling based on what you find in the TailwindCSS library to have that experience at least once. Next lecture we will start to adapt professional looking Flowbite components.
Tips and Tricks
-
Look up w3school pages for Links, Images, and Lists if you are not familar with their HTML tags and syntax.
-
Your layout doesn't need to be an exact or close replica. I just put that layout image so you have some guide.
-
add plenty of margins/paddings and increase font-size on desktop to not make large sections of your page appear empty. Ask ChatGPT or TailwindCSS documentation what those terms mean and how to use them.
-
Consider wrapping your heading and your two links in a div container with the classes
flex justify-between. Look up the TailwindCSS documentation howflexcontainers work. -
consider also the
gridcolumn layout variant for position elements. -
work with your partner on the same design to safe time.
-
ask generative AI for help on styling
-
It is also possible to hide and show items, for example:
<div class="hidden sm:block">Visible only on sm or larger.</div><div class="sm:hidden">Visible only on mobile.</div> -
Consider where the image could go on desktop and if it should be displayed larger perhaps. Make sure the image is hosted under
/priv/static/imagesnot a link to a image on a web url. -
Add some rounding, colors and borders to satisfy the "styling" test.