Lab 02: Class Design, Inheritance, and Exceptions
0. Credits
The lab content is the result of collective work of CSCI 204 instructors.
1. Objectives
In this lab, you will learn the following,
- Organizing your files in the Linux file system;
- Designing and implementing classes;
- Using inheritance to abstract classes at different levels;
- Importing Python packages of your own;
- Using exceptions to handle errors.
2. Preparation
You will need to create and go into the directory for today's lab and save all your work relating to this lab into this directory. The following instructions tell you how to create and maintain a directory (folder) structure on our Linux file system. We strongly recommend you work under this environment. If you are used to and would prefer to work on your own computer, you should create a similar folder structure on your personal computer.
First start a terminal window. Create the csci204 directory that will house all your CSCI 204 related work.
cd ~/ mkdir csci204
Then create the labs and lab01 directory and move the lab01.txt into the lab01 directory with the following Linux commands.
cd ~/ cd csci204/ mkdir labs mkdir labs/lab01 mv ~/lab01.txt labs/lab01/
The last mv command assumes your lab01.txt was stored in your home directory. If the file is not in that directory, please try to locate the file and move the file to your lab01 directory. Likely places you may have left your lab01.txt are Desktop or some similar places.
If you are not sure how to open a terminal window or what the above commands mean, please review what you did in last lab, or ask your TA or instructor.
Now assuming you are in ~/csci204/labs directory, create a directory for today's lab (lab02) and go into that directory with the following commands.
mkdir lab02 cd lab02
You will be creating some programs while using other existing programs for testing in this lab. Please copy the given testing files from the course Linux directory using the following Linux command. (Some of these programs are repeated in the lab description here.)
cp ~csci204/student-labs/lab02/* .
Note that there is a dot at the end of the command, which means copying the files to the current place and keeping the file names. You should see a collection of six test programs.
3. Introduction to Class Inheritance
The inheritance feature in Python allow us to define objects at different levels of abstraction with common features. Doing so makes programs easier to use and more maintainable. Let's look at the example from our textbook, all forms of publications share some common features such as title and author. Book is a child-class of publication which may contain information such as publisher and chapter titles in addition to the features in Publication while the Article child-class may contain journal title, journal volume, and such. The following illustration is from Appendix D of our textbook [1].
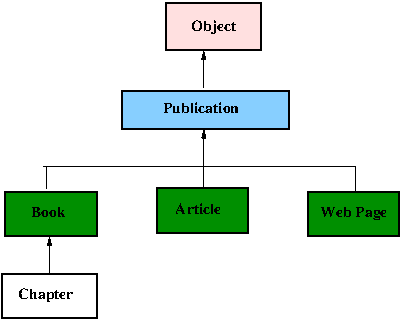
Figure 1: Class hierarchy of publications
In this design, the common features in the class Publication such as title and author do not have to be repeated in the inherited classes such as Book or Article, which simplifies class design a great deal. In this example, the code for the class Publication and Book may look as follows.
class Publication:
    """ Base class: Publication"""

    def __init__(self, title, author):
        self._title = title
        self._author = author

    def __str__(self):
        return '[' + self._title + '] by ' + self._author + '\n'

class Book(Publication):
    """ Derived class: Book"""
    def __init__(self, title, author, publisher, pub_date):
        super().__init__(title, author)
        self._publisher = publisher
        self._pub_date  = pub_date

    def __str__(self):
        s = super().__str__()
        s += 'Publisher: ' + self._publisher + '\n'\
             'Date: ' + self._pub_date + '\n'
In this example, the Book class inherits all features from the Publication class. The contents in the Publication class need not to be repeated in the Book child-class, thus simplifying programming and maintenance.
The syntax of Python inheritance is very simple. The child-class, in this case, the Book class, needs to just include the name of parent class, Publication in its class name definition. In class methods, including the constructor, a child-class can invoke the parent class methods by using the keyword super().
You will learn and practice the design and implementation of classes with inheritance in this lab.
4. Exercises with Inheritance: A Simple Pet Class
You are going to create a simple Pet class that will model a pet. Start thinking about pets. What types of attributes and behaviors do pets have? You might be able to come up with many. And, you may discover some attributes and behaviors that are highly dependent on the type of pet. Consider walking your pet. Clearly this is not a universal activity for all pets. Would you take your fish for a walk? On the other hand, some attributes ARE universal. For example, all pets would have a name, and an age. Designing a class hierarchy involves carefully picking common attributes for all objects of this type, e.g., all features common to pets, and deciding what attributes are specific for child-classes of objects, e.g., features that are only for fish, or dog.
Assume, for the sake of simplicity, that all pets that we are interested in have a name and an age. They can eat, sleep, and walk. Additionally, we'll use an extra attributes called activity to keep track of what our pet is currently doing, such as eating, sleeping, or walking. So a text description for a generic pet class would look as follows.
Table 1: Pet class design
| Pet | |
|---|---|
| Attributes | name |
| age | |
| activity | |
| Methods | walk() |
| eat() | |
| sleep() | |
4.1 Implement the Pet class
This seems like a reasonable start for a generic pet class. Go to Spyder, or IDLE, or using your favorite text editor to create this Pet class. Name your file pet.py. You should follow the guidance below.
- Create some class-wide constants to represent the current activity of the pet, walking, eating, and sleeping. Remember Python constants should use all upper-case letters with underscores, if necessary, as their names. For consistency, let's name these constants WALKING with a value of 1, EATING, 2, and SLEEPING, 3. In addition, define a constant called UNKNOWN to have a value of zero so we can handle erroneous cases.
- Define a constructor with two parameters, a name and an age. Assign these parameters to proper class attributes. The activity attributes should be initialized to UNKNOWN.
- Define a string representation of the object using the
__str__()method which should print the name, age, and the activity of the pet. - For each of the methods,
walk(), eat(),andsleep(), all you need to do is to set the current activity to the appropriate value.
If you implemented your Pet class properly, run the following test program. This is the file you copied at the begining of the lab, test_pets.py.
'''
A test program for class Pet

Converted from the Java programs developed by Brian King for the Java version
of CSCI 204.

Xiannong Meng
2017-07-26
'''
from pet import *

def test_pet( this_pet ):

    print(this_pet)
    pet_name = this_pet.name
    print('Taking ' + pet_name + ' for a walk')
    this_pet.walk()
    print(this_pet)

    print('Feeding ' + pet_name)
    this_pet.eat()
    print(this_pet)

    print('Sending ' + pet_name + ' to bed.')
    this_pet.sleep()
    print(this_pet)

def main():
    my_pets = [Pet('Garfield', 4),
               Pet('Sleepy', 8)]

    for pet in my_pets:
        print('--- begin ---')
        test_pet(pet)
        print('--- end ---')

main()
test_pets.py)
--- begin --- Garfield (age: 4) is doing UNKNOWN Taking Garfield for a walk Garfield (age: 4) is WALKING Feeding Garfield Garfield (age: 4) is EATING Sending Garfield to bed. Garfield (age: 4) is SLEEPING --- end --- --- begin --- Sleepy (age: 8) is doing UNKNOWN Taking Sleepy for a walk Sleepy (age: 8) is WALKING Feeding Sleepy Sleepy (age: 8) is EATING Sending Sleepy to bed. Sleepy (age: 8) is SLEEPING --- end ---
test_pets.py
Please read the test program and the output and make sure you understand what is going on. In particular, note that the test_pets.py program IMPORTS the Pet class by the line
from pet import *
This line means that we are importing everything from the file named pet.py, just like we'd import any other Python packages.
4.2 Implement the Dog and Cat child-classes
Note that at this point, the objects in the Pet class have the same generic behavior. You are now to implement child-classes, the classes that are derived from the parent class, of Dog and Cat.
Follow the example earlier in the lab description about the classes Publication and Book to implement the child-class Dog and Cat. Here are a few notes.
- Both the Dog and Cat classes need to implement the three methods, eat(), walk() and sleep() as we can imagine the behavior of these activities by a dog may differ from those of a cat. In our implementation, we will simply call (a.k.a. invoke) the corresponding method from the super class Pet. The different behavior of a dog and a cat is simply represented by printing a different message in addition to calling the method in its parent class.
- Neither the Dog and Cat class in our implementation has any extra attributes besides the name and the age. So the constructors of these two child-classes will simply call the constructor of its parent class.
- In our Publication and Book example, both the parent class and the child-class are implemented in the same file, say,
pub.py. So when we say in an application programfrom pub import *
both the parent class and the child-class are available to the application program. In the Pet and its child-classes, you are asked to implement each class in a separate file, i.e., the Pet class in
pet.py, the Dog class indog.py, the Cat class incat.py. This means in yourdog.pyandcat.pyfiles, you have to have the linefrom pet import *
in order to use the Pet class.
If you implement the Dog and Cat classes properly, run the following program. This is in the file test_dogs_cats.py.
'''
A test program for classes Cat and Dog.

Converted from the Java programs developed by Brian King for the Java version
of CSCI 204.

Xiannong Meng
2017-07-26
'''
from pets import *

def test_pet( this_pet ):

    print(this_pet)
    pet_name = this_pet.name
    print('Taking ' + pet_name + ' for a walk')
    this_pet.walk()
    print(this_pet)

    print('Feeding ' + pet_name)
    this_pet.eat()
    print(this_pet)

    print('Sending ' + pet_name + ' to bed.')
    this_pet.sleep()
    print(this_pet)

def main():
    my_pets = [Cat('Garfield', 4),
               Dog('Snoopy', 7),
               Cat('Sleepy', 8)]

    for pet in my_pets:
        print('--- begin ---')
        test_pet(pet)
        print('--- end ---')

main()
test_dogs_cats.py)
which should generate a result similar to the following.
--- begin --- Garfield (age: 4) is doing UNKNOWN Taking Garfield for a walk Walk? Dude,seriously? Garfield (age: 4) is WALKING Feeding Garfield Lasagna, please. Garfield (age: 4) is EATING Sending Garfield to bed. Yes. I need 23 hours of this each day! Garfield (age: 4) is SLEEPING --- end --- --- begin --- Snoopy (age: 7) is doing UNKNOWN Taking Snoopy for a walk Walk?!?! Oh boy oh boy!!! Pant! Pant! Pant! Snoopy (age: 7) is WALKING Feeding Snoopy Begging for food... kibbles and bits please. Snoopy (age: 7) is EATING Sending Snoopy to bed. Zzzzzz (drooling)... Snoopy (age: 7) is SLEEPING --- end --- --- begin --- Sleepy (age: 8) is doing UNKNOWN Taking Sleepy for a walk Walk? Dude,seriously? Sleepy (age: 8) is WALKING Feeding Sleepy Lasagna, please. Sleepy (age: 8) is EATING Sending Sleepy to bed. Yes. I need 23 hours of this each day! Sleepy (age: 8) is SLEEPING --- end ---
test_dogs_cats.py
Can you notice the differences between the program test_dogs_cats.py and test_pets.py? If you read carefully both programs, the differences are really very minimal, in test_pets.py the objects are defined as Pet, in test_dogs_cats.py the objects are defined as Dog or Cat, a child-class of Pet. The output of the test programs are very different because the behavior of a Cat is very different from that of a Dog. As a side note, Linux has a very useful command that can compare and tell the difference between two files. Try the following.
diff test_dogs_cats.py test_pets.py
Observe the output. Convince yourself that you understand that is going on in using the diff command.
Make sure your programs pet.py, cat.py, and dog.py work properly, and save them before proceeding.
5. Exceptions
Another feature we will learn in this lab is Exception. We often encounter situations in which we know there are errors in data or user input. Python, like many other modern programming languages, allow the programmers to design programs to anticipate and handle these error conditions. The key mechanism of handling errors is the Python try-except structure.
Python has a collection of pre-defined exceptions that the programmers can use. The following example illustrates the concept [2]
import random
try:
  ri = random.randint(0, 2)
  print('randome value : ' + str(ri))
  if ri == 0:
    infinity = 1/0
    raise ZeroDivisionError
  elif ri == 1:
    raise ValueError("Message")
  elif ri == 2:
    raise ValueError # Without message
except ZeroDivisionError:
  print('Divided by zero')
except ValueError as valerr:
  print("Value error: " + str(valerr))
except: # Any other exception
  print('Unknow error')
finally: # Optional
  pass # Clean up

class CustomValueError(ValueError): pass # Custom exception
try:
  raise CustomValueError
  raise TypeError
except (ValueError, TypeError): # Value error catches custom, a derived class, as well
  pass                          # A tuple catches multiple exception classes
test_exception.py program that illustrate the concept of try-except clause
Copy and save this program as test_exception.py, then run the program multiple times, trying to observe the cases where all five different error values are generated. The program generates a random number between 0 and 4, inclusive. For each value, the program invokes some form of exception. The number generation and the invoking exceptions are contained in a try-except clause. If something is worthy to cause exceptions (values 0 through 3), an exception is raised and caught in the proper except clause and the programming statements within the except will be executed.
In this example, two exceptions, ZeroDivisionError and ValueError are defined by Python. One exception, the CustomValueError class is defined by the programmer. Note the class definition of CustomValueError is very similar to any inherited class. It calls the constructor of its parent class (ValueError) first, before adding any of its own action. The ValueError exception class actually is a child-class of a more general class Exception. See this document https://docs.python.org/3/library/exceptions.html for a complete description and hierarchy of Python exceptions.
In the rest of the lab, you are asked to implement a Counter class hierarchy using inheritance along with appropriate exception handling.
5.1 Implementing the Counter class hierarchy
Now that you have some experiences working with class design and implementation, we will give you some text description of what the classes should do, you will then design and implement the classes accordingly. So please read the description carefully and think about how you would proceed.
The Counter class hierarchy can be illustrated in the following diagram.
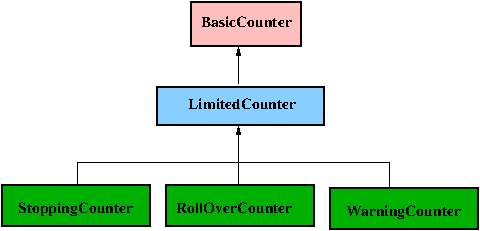
Figure 8: The Counter class hierarchy
The top-most class is the BasicCounter which contains two attributes, counted and the_initial_count along with five methods, count(), un_count(), reset(), set_count_to(), and get_count_value(). The meaning of the attributes and the behavior of the methods are as follows.
- The attribute
countedkeeps the current value of the counter which could be any integer, positive, negative, or zero; - The attribute
the_initial_countstores the initial value of the counter which can be used to reset the counter when needed; - The
count()andun_count()methods increment or decrement the counter value by one, respectively; - The
reset()method resets the counter value tothe_initial_count; - The
set_count_to()andget_count_value()methods set and retrieve the counter value, respectively.
The LimitedCounter class inherits all features from the BasicCounter class. In addition, it has two class-wide constants, DEFAULT_MIN and DEFAULT_MAX which specify the default upper and lower limit of the counter value. The user is allowed to supply their own min and max, but if none is specified then the default values should be used. The min value of the LimitedCounter will also be used to specify the initial counter value. The idea for this counter is that it contains limits for counter values. Accordingly, the LimitedCounter class has four methods related to the limits, is_at_min() and is_at_max() which checks to see if the counter value is at its limits, as well as get_min() and get_max() which returns the limit values. Note that we are not allowed to change the limits once initialized. Also note that the LimitedCounter object does not take any actions if the value reaches limits. In other words, if the counter reaches its limits and the counter value is incremented or decremented one more time, the operation will succeed without any error messages, e.g., the actual counter value could go outside the specified ranges. One can assume this class of counter isn't really useful in any applications. However, we put it here to show the features of inheritance and you will find that it is useful to create this level of abstraction.
The counters at the next level, the StoppingCounter, the RollOverCounter, and the WarningCounter are all derived from LimitedCounter. The StoppingCounter will stop incrementing or decrementing the counter value once reaching the limits; the RollOverCounter will roll over the counter value on decrementing or incrementing after having reached the limits; the WarningCounter will raise exception and stop counting if the counter value reaches its limits.
Your task now is to implement the first four counters first, BasicCounter, LimitedCounter, StoppingCounter, and RollOverCounter. Unlike the first part of the lab where the parent class and child-classes are stored in separate files, we ask you to implement these counters in one file called counter.py so we appreciate different ways of implementation. You will be asked to implement the WarningCounter a bit later.
Make sure you test often as you progress. Here is a sample program to test the RollOverCounter class (in the file test_rollover_counter.py). The counter starts with its attributes min and max being 10 and 12, respectively. One can see the behavior of this counter through the sample run shown in the figure. The test programs for other counters are similar. See various given testing programs for details.
from counter import *   # the counter.py contains all classes, import them for testing

print('Testing RollOverCounter...')
my_count = RollOverCounter(10, 12)

print('Its min value should be 10 ... It is ' + str(my_count.get_min()))
print('The count value should be at minimum ... ' + str(my_count.is_at_min()))
print('The count value should not be at maximum ... ' + str(my_count.is_at_max()))

my_count.count()
my_count.count()
print('Increment twice, the count value should be 12 now ... ' + str(my_count.get_count_value()))

print('The count value should be at maximum ... ' + str(my_count.is_at_max()))
print('The count value should not be at minimum ... ' + str(my_count.is_at_min()))

my_count.count()
print('Increment one more time, the count value should rollover to 10 ... ' + str(my_count.get_count_value()))

my_count.un_count()
print('Decrement three times, the cout value should rollover to 12 ... ' + str(my_count.get_count_value()))
test_rollover_counter.py)
5.2 Design and implement CounterException and WarningCounter class
Following the description and the example at the beginning of Section 4 of the lab description for Python exceptions, you are to implement a CounterException class and use it in the WarningCounter class. The idea is that if the counter value in a WarningCounter object has reached its limit (upper limit or lower limit), the counter value will not change, but the counter object will raise a CounterException. The CounterException constructor will call the constructor of its parent class Exception first, then print its own error message. Note that in the random number example in Figure 7, the parent class of the CustomValueError is ValueError, you could use the ValueError as the parent class of CounterException, but you can also use Exception as the parent directly. Look through the test_warning_counter.py file to see which more specific exceptions (inheriting CounterException) you need to write.
Implement both the WarningCounter and CounterException in the file counter.py.
After completing the implementation of the WarningCounter and CounterException, try the following program which is test_warning_counter.py.
from counter import *

def readLimit(prompt):

    v = 0
    while True:
        try:
            v = int(input(prompt))
            if v < LimitedCounter.DEFAULT_MIN:
                raise ValueTooSmallError
            elif v > LimitedCounter.DEFAULT_MAX:
                raise ValueTooLargeError
            break
        except ValueError:
            print('Number error, try again!')
        except ValueTooSmallError:
            print("This value is too small, try again!")
            print()
        except ValueTooLargeError:
            print("This value is too large, try again!")
            print()
    return v

print('Testing WarningCounter...')
my_count = WarningCounter(10, 12)

print('Its min value should be 10 ... It is ' + str(my_count.get_min()))
print('The count value should be at minimum ... ' + str(my_count.is_at_min()))
print('The count value should not be at maximum ... ' + str(my_count.is_at_max()))

my_count.count()
my_count.count()
print('Increment twice, the count value should be 12 now ... ' + str(my_count.get_count_value()))

print('The count value should be at maximum ... ' + str(my_count.is_at_max()))
print('The count value should not be at minimum ... ' + str(my_count.is_at_min()))

'''
print('Increment one more time, result in exception ... ')
my_count.count()
'''

my_count.un_count()
my_count.un_count()
print('The count value should be at minimum ... ' + str(my_count.is_at_min()))
print('The count value should not be at maximum ... ' + str(my_count.is_at_max()))

'''
print('Decrement one more time, result in exception ... ')
my_count.un_count()
'''

lo = LimitedCounter.DEFAULT_MIN
hi = LimitedCounter.DEFAULT_MAX
while True:
    try:
        lo = readLimit('Enter minimum: ')
        hi = readLimit('Enter maximum: ')
        if lo >= hi:
            raise ValueIncorrectError
        break
    except ValueIncorrectError:
        print('The values of ' + str(lo) + ' and ' + str(hi) + ' are wrong.')

print('lo ' + str(lo) + ' hi ' + str(hi))
test_warning_counter.py)
6. Prepare for submission
Review your programs and make sure your programs follow proper styles including naming and comments. Remove extra printing statements you may have put in place during the development of the program. Format the programs properly.
Make sure at the top of the each program you include a global comment section following the sample below that indicate the lab assignment, your name, your lab section, and your professor's name.
'''CSCI 204 Lab 02 Class Design, Implementation, and Exceptions Lab section: CSCI 204.L61, Tuesday 10-11:52 Student name: Sam Snoopy Instructor name: Professor Garfield'''
7. Submission
Submit the following files individually to the course Moodle site (or submit them as a zip file). Yes, please submit all the files so we can run all testing programs without copying anything else to your submission.
cat.py, dog.py, pet.py, test_dogs_cats.py, test_pets.py,
counter.py, test_rollover_counter.py, test_warning_counter.py, test_limited_counter.py, test_stop_counter.py.
References
- Rance D. Necaise. (2010). Algorithms/Data Structures and Algorithms Using Python. Wiley:New York, NY.
- Wikibooks Authors. Python Programming/Exceptions. URL: https://en.wikibooks.org/wiki/Python_Programming/Exceptions. Accessed: 2019-10-18.